Ever thought about starting a travel blog? Whether you want to know how to start a travel journal to share your travel adventures with family or friends or hope to inspire the world and fund your travels, a travel blog can be lots of fun. Below we will show you how to start a travel blog too!
I started Where’s Sharon a massive 10 years ago. It has now grown into something which not only lets me share my adventures, but inspire others to do the same. It also has the nice benefit that it provides me with income and opportunities to see more of this fabulous world.
Many people ask me how to create a travel blog, but quickly get stressed out by all the options and choices. To help with this my husband Joshua, my personal IT guru, has written this quick and easy guide to how to create a travel blog so you can be sharing your adventures in only about 15 minutes. You have no excuses anymore. Get started now!
One question that pops up from people wanting to write about their travels is how to make a travel blog? It’s easy to do – anyone can quickly and cheaply make your own travel blog.
Some people worry that setting up a WordPress blog is time consuming, technical and expensive – especially compared to something free like Blogger. That’s simply not true. If you follow the steps here you could be up and running in as little as 15 minutes.
So if you’re interested in starting a travel blog, quickly, and simply, this article is for you.
Contents
How to start a travel blog
Step 1: Pick a name
Or at least a domain name – what people enter in the address bar of a browser to find your blog. It’s an important step, so let’s get it out of the way first.
It’s a creative process so I’m not going to give you too much advice, other than to say shorter domain names are easier to remember and type.
In terms of domain types (aka what’s on the end) .com or .net is cheaper and there are no restrictions as long as it’s available. Country specific domains, those ending with a country code – like .au for Australia, usually cost more and may have restrictions on who can buy them. For example, you can only buy a .com.au if you have an Australian Business Number. It may also not be the best choice if you are hoping for an international audience.
To check if a domain name you like is available, go here. You can check up to 50 names at once. You may need to check quite a few as often the best ones are already taken.
Step 2: Buy the domain name
Buying a domain name is simple. If you’re getting a top level domain (a .com or .net or similar) there are a lot of options. Find a deal you like and buy your domain. We like NameCheap – their price includes domain privacy and we find them the best value.
Domain privacy is an important consideration. By default, the public domain Whois records will include the name, address and other details of the person who registers an account. Domain Privacy stops that from being public. If you don’t want your address public knowledge, you need to get domain privacy.
You’ll need to set the DNS records once you have your host set up in the next step. Your hosting company will give their DNS Servers – which look like dns1.host.com or 123.123.12.123 – to set for your domain. If you’re hosting your site with SiteGround, log in to your account, go to My Accounts, and under Information & Settings you’ll see the servers:
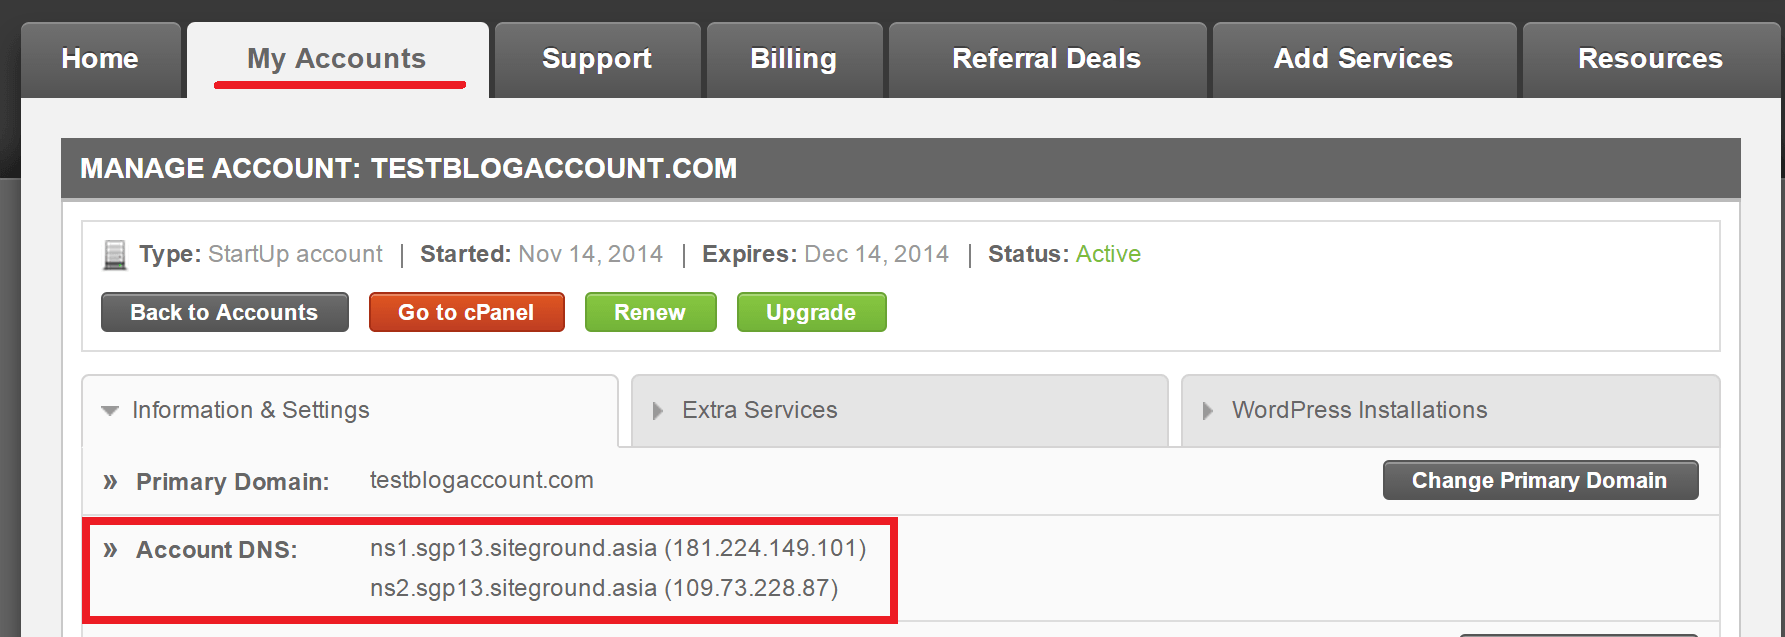
Somewhere in your domain name seller’s account should be a DNS settings page to put these. It varies from company to company so I can’t be more specific here, but the domain sellers will be able to help if you get stuck. If you sign up with hosting with SiteGround and get their free domain name, then you will not need to do this.
Step 3: Select a hosting company
A hosting company is the organisation that will “host” your blog – that is, have it on a web server somewhere so that other people can look at it. The next step to create your own travel blog is to set up your hosting.
To keep things simple I recommend a host that comes with a free cPanel account. cPanel is software that will make setting up the blog itself incredibly simple.
In terms of what else to look for, don’t stress about disk space, bandwidth or anything else at this stage. Unless you know you’re going to need a lot, most basic plans will cover your needs. And all companies will happily upgrade your account (without you needing to do anything to your site) if you need it.
Our favourite hosting company is SiteGround. They are fast, have great customer support and are cheap – everything we look for. Check out their shared hosting plans:
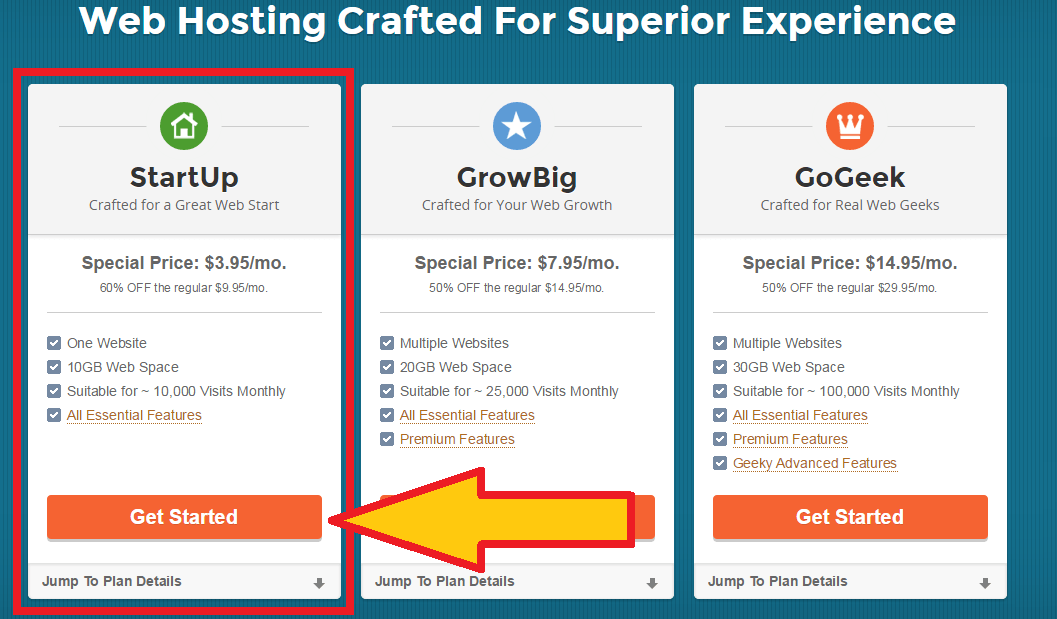
The first thing you’ll need to do is to pick a plan. The StartUp plan is perfect to get you started. Don’t worry about the “Suitable for ~10,000 Visits Monthly” comment. It should handle a lot more. Next is is entering your domain name, either the one you want (see Step 1) or one you already have (if you’ve bought one in step 2):

On the next page you can enter all the necessary detail. At the bottom SiteGround gives you some options. First is payment length: pay 1 year up front and they waive their setup fee. Then there’s some add-on services for your SiteGround account:

None of these options are essential, and can be safely unticked, but all are helpful. For those options you don’t want now you can add them later on, through your account.
As mentioned before, one option worth considering is the “Domain Privacy” option.
You can watch a step by step video of setting up your site on SiteGround here:
Step 4: Set up your travel blog
Now we’re getting to the fun part. If you’ve bought a hosting account with cPanel, this is dead easy.
We’ll be using cPanel to install WordPress – the world’s favourite blogging platform. There are alternatives, but it’s one of the easiest to use, most flexible, and easiest to set up. And some estimates have 20%+ of the world’s internet sites running it. It’s what WheresSharon.com is built on. So let’s go…
First, go to your cPanel account. Usually a hosting company will email you the details, or have a link in your account. For SiteGround, log on to your account, go to My Accounts, select your account, and under Information & Settings there is an Access cPanel button.
The following screenshots are from a SiteGround account, but other companies will look similar. Once logged in, go to WordPress Tools and then select WordPress Installer:

Other hosts may have the Installer in a section called Software or something similar. Most hosts have a WordPress install option, but some may have a link to something called Softaculous which will launch the WordPress setup process.
For those of you using SiteGround, you’ll be taken to the settings page. The first two sections (Software Setup and Database Settings) can be left – although check your domain name is selected in the Choose Domain field. Don’t worry about the other fields, the default settings will be fine.
In the Site Settings section, enter your blog’s name (not the domain name, but it can be the same or similar if you want) and a short description. For this site the name is (shockingly) “Where’s Sharon”, and the description is “Family Travel Blog – Travel with Kids.” These tend to pop up in different places around your site, depending on your blog’s theme (which we discuss in the next step). You can change it later if you change your mind.
Ignore the Enable Multisite (WPMU) checkbox.
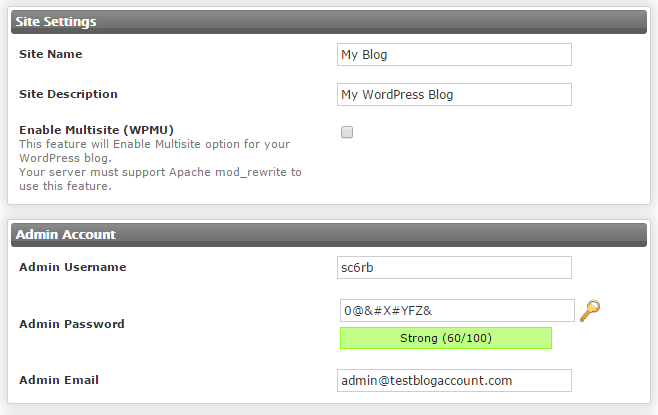
In the Admin Account section, pick a username (avoid “admin”), a password (not any of these, and the longer the better but memorable). Then enter your email address.
You’re done – the other sections are fine. Press the Install button at the bottom, sit back and watch the magic. It should take less than 2 minutes.
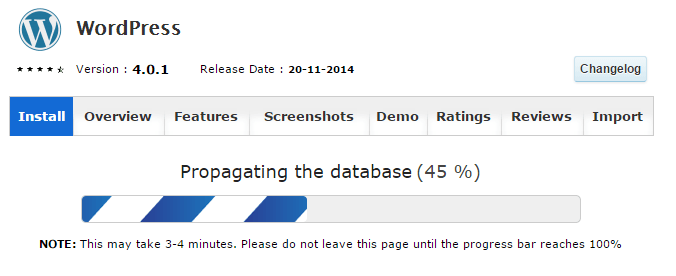
And that’s it! You should now be able to go to your domain, and see your site. Congratulations, you’re now a travel blogger!
If you need more help, check out our full guide plus youtube video of how to set up your WordPress hosting. Read more here.
Step 5: Make it look good
But we didn’t pick WordPress just for the easy setup. It is also incredibly customisable. Due to its popularity there are thousands of plugins to customise behaviour and thousands of themes to make it look however you want.
Many themes are free, some are not. While there’s some good free themes, generally paid themes look and work better, especially if you want it to work across all devices, like phones and tablets. They are usually far easier to customise and set up. Here’s some theme sites Sharon recommends and uses across her sites. The majority are only around $50.
- Theme Forest – a really big range of good looking themes, including Jupiter, used on Where’s Sharon, and Newspaper, used on our Digital Nomad blog.
- My Theme Shop for cheaper, clean and easy themes that are still powerful (check out Splash which is our favourite for reviews). Use the coupon code: GETSTARTEDNOW! for 10% off.
- Thrive Themes – for fast loading themes that work across most devices. We have been using these themes for our newest sites since they are optimised for speed and social sharing. I particularly like PerforMag.
And that’s it! You now know how to create a travel website and you’re all set up. All that’s left is to fill it with your travel stories. Good luck!
You can also read my full, indepth guide with 12 YouTube videos about how to start a blog here which includes everything from picking a great domain name to setting up hosting to creating menus for your site and making it look good!
Disclaimer: This post contains affiliate links. If you use these links, I receive a small commission. This does not cost you anything and will help support our blog. They are all services and products that we recommend and personally use. Thanks!
Tags: Blogging


